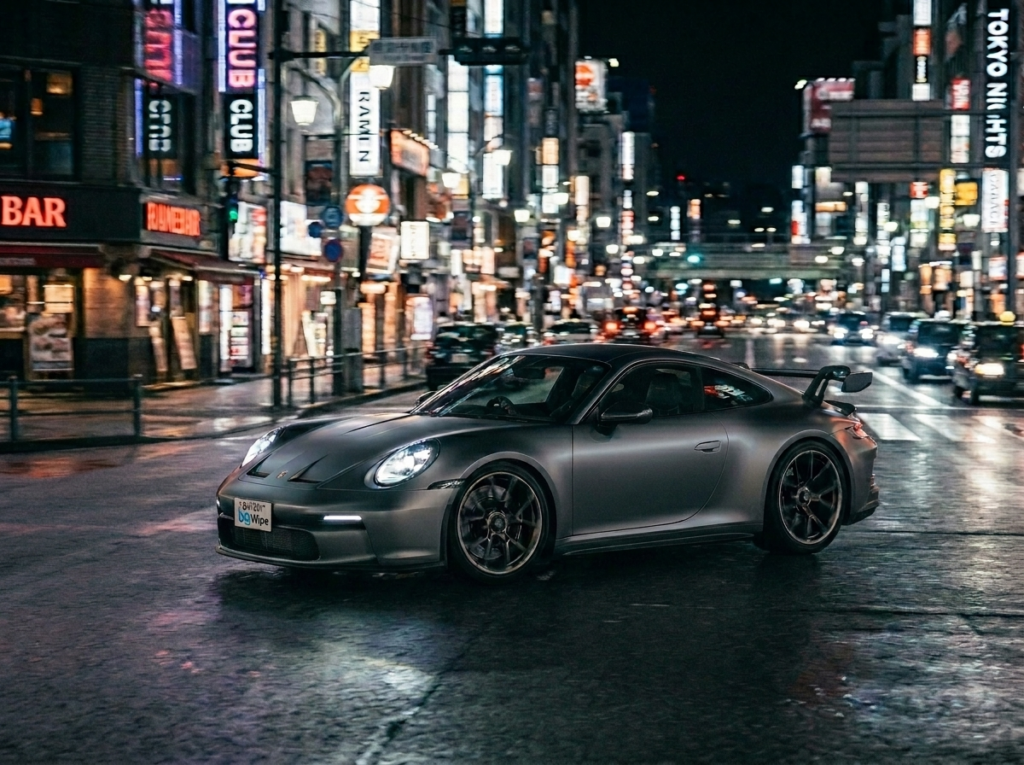
There is something about a car at night that daylight simply cannot replicate. City glow bouncing off a polished hood. Headlights carving through the dark. Reflections stretching across wet pavement. Nighttime car photography creates images that feel cinematic, dramatic, and completely alive.
But it is also one of the most technically demanding styles of photography you can attempt. Light is scarce, backgrounds are unpredictable, and the wrong setting can ruin an otherwise perfect shot. Whether you are a car photographer building a portfolio or a used car dealership wanting standout inventory visuals, this guide covers everything you need, from the best camera settings for car photography at night to creative night car photoshoot ideas and how to handle post-processing efficiently.
What Is Night Car Photography?
Night car photography is a genre of automotive photography conducted between dusk and dawn, utilizing long exposures to capture stunning visuals. Car photography at night is usually done in low-light or dark conditions using ambient light sources, long exposures, light painting, or a combination of all three. It spans a wide range of styles: a still car glowing under a single streetlight, car light trails night photography showing streaks of motion across an urban scene, dramatic close-ups of LED headlights cutting through fog, or rain-soaked asphalt doubling reflections beneath a parked vehicle.
For enthusiast photographers, the appeal is the mood and visual drama that no daytime shoot can produce. For used car dealerships, a well-executed night car photoshoot can differentiate inventory listings in a way that flat, midday lot photos never will.
Best Camera Settings for Car Photography at Night
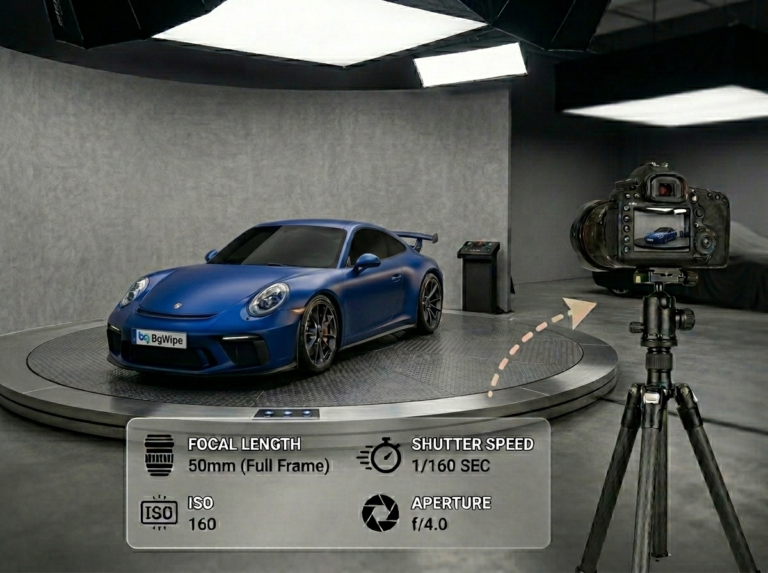
Getting your settings right is where everything begins. Nighttime car photography gives you full creative control precisely because you must set every parameter yourself. Here is a reliable framework for night car photography settings.
1. Shoot in Manual Mode
Auto and semi-auto modes fail in low light. They overexpose bright light sources, underexpose the car body, and produce inconsistent results frame to frame. Manual mode gives you total authority over the exposure triangle.
2. Shutter Speed – 10 to 30 seconds for a Still Car
This is the most important variable in nighttime car photography. A long shutter allows the sensor to gather ambient light gradually, producing a properly exposed car even in near-darkness. For car light trails night photography, start around 10 to 15 seconds and adjust based on traffic speed and desired trail length. For a completely static car in a very dark environment, 30 to 60 seconds may be necessary.
3. Aperture – f/8 to f/11
This range delivers sharp focus across the full length of the vehicle. Since a car is a wide subject, depth of field matters. Open to f/2.8 or f/4 only when you are isolating a specific detail or shooting a night car photo inside the cabin where depth of field is not critical.
4. ISO – 100 to 400
Keep it as low as your ambient light allows. Car bodywork, especially on large flat panels, shows noise immediately at higher ISO values. In well-lit urban environments, ISO 400 is a workable ceiling. In darker locations with a long enough shutter, ISO 100 produces significantly cleaner results.
5. White Balance – Auto or Tungsten.
City night scenes mix sodium streetlights, LED signs, and car headlights simultaneously. Auto White Balance handles this reasonably well as a starting point. Shoot in RAW so you can adjust color temperature precisely during editing without sacrificing image quality.
6. Focus – Manual
Autofocus hunts in the dark and frequently locks onto the wrong element. Switch to manual focus, aim at a high-contrast edge of the car or a lit surface, and zoom into your LCD preview to confirm sharpness before committing to a long exposure.
Essential Equipment for Night Car Photography
The right gear removes the mechanical obstacles so you can focus on the shot.
1. Tripod
There is no version of night car photography without a tripod. A 15-second handheld exposure produces nothing usable. Even a mid-range tripod eliminates camera shake entirely during long exposures.
2. Remote Shutter Release
Pressing the camera’s shutter button by hand introduces vibration at the moment the shutter opens. A cable release or wireless remote fires the shutter with zero physical contact, keeping long exposures pin-sharp.
3. 24mm to 50mm Lens
A wide to standard prime lens is ideal for full-car shots. Wide car photography angles capture the vehicle in its environment and add a sense of scale. A 50mm renders natural, undistorted proportions that flatter the car’s lines.
4. Lens Hood
Streetlights and neon signs produce flare that washes out detail on reflective surfaces. A hood reduces this without any settings adjustment needed.
5. ND Filter (optional)
If you are shooting during blue hour or early evening when residual daylight is still present, a neutral density filter lets you maintain a long shutter without overexposing the sky. This is especially useful for car light trails night photography before full dark.
How to Photograph Cars at Night: Step-by-Step
Knowing the settings is one thing. Executing a successful night car photography session requires a clear process.
1. Scout the Location Before Dark
The best night car photography locations need to be identified in daylight. Look for interesting ambient light sources, clean sight lines, and a surface worth including in the frame. Wet pavement, urban backdrops, and open architecture all work well.
2. Set up During Blue Hour
The 20 to 40 minutes after sunset, called blue hour, offer a soft ambient light that blends naturally with artificial sources. The sky still holds color and detail, which gives your images depth that full-dark scenes often lack. Many of the best nighttime car photography images are captured here.
3. Clean the Car Before Shooting
Every fingerprint, dust particle, and water spot is magnified in high-resolution nighttime images. Clean the paint, glass, and wheels before the shoot. This car retouching is a step that separates professional-quality night car photoshoots from amateur ones.
4. Lock Down Your Camera and Test Exposures
Mount on the tripod, dial in your starting settings (f/8, ISO 200, 15 seconds), fire one frame, and zoom in on the LCD to check sharpness and exposure across the car body. Adjust shutter speed first before touching ISO.
5. Shoot RAW
Night scenes involve extreme contrasts and mixed color temperatures. RAW files preserve all sensor data and give you the flexibility to recover highlights, adjust white balance per area, and control noise reduction in post without quality loss. JPEG files at night produce significantly inferior editing headroom.
How to Photograph Car Light Trails at Night
Car light trails night photography is one of the most visually striking things you can do with a camera at night, and it is more achievable than most beginners expect.
1. Long Shutter Exposure
A long shutter exposure records the path of moving headlights and taillights as unbroken streaks of color across the frame. The subject car, being stationary and exposed by ambient or artificial light, stays sharp. The passing cars leave only their lights behind, which is why they do not appear as solid blurry shapes.
2. Perfect Location
Find a location where traffic moves at a consistent speed past your parked subject car. A curved urban road, an elevated overpass with a clear view below, or a bridge with moving vehicles behind the subject all work well.
3. Shutter Speed, Aperture, and ISO
Set your shutter to 10 to 20 seconds, aperture to f/8 or f/11, and ISO to 100 or 200. Use your remote release. Wait for traffic to pass behind the car during the exposure. Multiple passes stack up. The longer the shutter stays open, the denser and more dramatic the trails become.
For maximum impact, position the car so the trails flow naturally through the composition rather than cutting across it awkwardly. Slightly elevated shooting positions looking down toward a road work particularly well.
Creative Night Car Photography Ideas Worth Trying
If you want to push beyond the standard approach, these night car photography tips and directions consistently produce strong results.
1. Rain and Wet Asphalt Photography
Car photography night rain setups are a photographer’s favorite for good reason. Wet roads reflect every available light source, doubling the visual complexity of the scene. The reflections on the road often become as interesting as the car itself. Shoot low and angle toward puddles. Car pics at night after rain are consistently among the most shared automotive images online.
2. Light Painting
With the shutter open for 30 seconds or more in a very dark environment, walk around the car with a handheld LED light aimed at the bodywork. You selectively illuminate curves, panels, and details with controlled highlights. The camera does not register you moving, only the light you direct. The result is a car that appears lit from within, with no shadow from an external flash source.
3. Interior Shots
Night car photo inside the cabin works well with dashboard ambient lighting, illuminated trim strips, or even a phone screen as a controlled fill light. A wide lens at f/2.8 and ISO 800 to 1600 with a 5 to 10 second exposure typically produces a warm, immersive interior image that no daytime shot replicates.
4. Urban Backdrops
Cars at night in city environments gain a layer of visual depth that daytime photography cannot access. Building lights, illuminated signage, and moving traffic in the background create a cinematic quality. Position the car with the cityscape or lit architecture behind it and let the ambient glow act as a natural fill light.
5. Starburst Headlights
Setting your aperture to f/16 or f/22 with the car’s headlights on and the shutter open for several seconds produces a starburst effect at each light point. It is a subtle technique but it adds a professional, editorial quality to car photos at night.
Challenges of Night Car Photography (and How to Handle Them)
Night car photography rewards patience but the obstacles are real and consistent.
1. Noise
Noise on large, flat surfaces. Car bodywork shows grain immediately because it is wide, uniform, and reflective. Keeping ISO at 400 or below, combined with noise reduction in post-processing, handles this in most situations. Shooting RAW gives you more control over how noise is rendered during editing.
2. Mixed Color Casts
Different artificial light sources produce different color temperatures across a single car panel. Sodium streetlights cast orange. LED signs cast blue or green. Headlights are white to cool white. These conflict visibly on the car’s surface. Shooting RAW and correcting white balance per zone using selective masking in Lightroom or similar software resolves most of this.
3. Uncontrolled Backgrounds
Even with a good location, a night car photoshoot at a dealership lot picks up stray vehicles, signage, or equipment in the background. Night does not hide clutter as reliably as most people expect. Location scouting and careful framing are the only in-camera solutions. Background replacement from uncontrolled and untidy backgrounds to virtual car showroom is in post-processing handles what the camera cannot.
4. Exposure Variability Across Locations
What works at f/8, ISO 200, 15 seconds in a lit urban environment fails in a darker suburban area. Build time into every session to test exposures and read your histogram. The histogram should show data across the full range without clipping the highlights on any lit surface of the car.
How BgWipe Solves the Post Night Car PhotoShoot Problem?
Night car photography produces dramatic, attention-grabbing images. But for used car dealership photography, there is a practical limitation: even a technically excellent nighttime photo can carry a distracting background. A dark, poorly lit lot. Visible competing signage. A location that does not represent the quality of the vehicle itself.
BgWipe solves this directly. It is an AI-powered car photo editing platform built specifically for automotive dealerships. After your shoot, you upload your images and BgWipe removes the background instantly, no matter how complex or cluttered, and replaces it with a clean, studio-quality setting. The vehicle takes center stage, cleared of every distraction.
- Beyond Background Replacement: BgWipe covers every post-processing step that dealership inventory photos require:
- Reflection Removal: Night photos capture reflections on paint and glass from streetlights and surrounding light sources. BgWipe eliminates them with precision, revealing the car’s true finish.
- Shadow Generation: A car floating against a clean background with no ground shadow looks fabricated. BgWipe adds a natural, realistic ground shadow that anchors the vehicle and makes every image look genuinely studio-produced.
- License Plate Masking: BgWipe automatically detects and blur license plates across your entire inventory, keeping listings compliant without manual effort per image.
- Window Tinting: Apply a clean, consistent tint across inventory photos in one click to give vehicles a premium aesthetic that attracts high-intent buyers.
The entire BgWipe solutions workflow integrates with the platforms dealerships already use, so images move from your camera to live listings without friction.
Conclusion
Night car photography is one of the most visually rewarding styles in automotive imaging. The drama, the reflections, the light trails, the cinematic depth that darkness creates, none of it is available in a daylight shoot. But producing images that are technically clean, creatively strong, and listing-ready requires both solid camera technique and efficient post-processing.
Get the shoot right with the settings and techniques in this guide. Then let BgWipe handle everything after the shutter closes. Try BgWipe PhotoRoom free and see how fast a raw nighttime lot photo becomes a studio-quality listing visual.