A great car photo does one job, it stops the scroll. For a used car dealership in the US, that pause is the difference between a VDP view and a lost lead. For an automotive photographer, it’s the difference between a portfolio piece and a deleted frame.
The good news: most of what separates a forgettable shot from a showroom-grade image is not expensive gear. It comes down to a handful of decisions about angle, light, background, camera settings, and editing. This guide walks through 15 car photography tips used by professional automotive photographers and high-performing dealership inventory teams in the US, then shows where AI editing fits into the modern workflow.
What Is Car Photography?
Car photography is the practice of capturing vehicles in a way that showcases design, condition, and appeal, for commercial sale (dealership inventory, auction listings, marketplace ads), editorial content, or artistic portfolios.
It splits into two broad categories:
- Commercial and Dealership Photography: It should be consistent, honest documentation of every exterior angle, interior detail, and feature so buyers can evaluate a vehicle online.
- Creative Automotive Photography: It should have stylized shots built around mood, location, and motion for magazines, social media, car clubs, and brand campaigns.
The techniques overlap. The fundamentals, light, angle, composition, reflections, camera settings, apply whether you are shooting 50 used cars on a lot this morning or a single luxury car at golden hour.
Top 15 Pro Car Photography Tips in 2026
These 15 tips cover the full workflow, from the moment you walk up to the vehicle to the final edit that ships to a VDP or portfolio. They apply whether you’re shooting 50 used cars on a lot or a single luxury car at golden hour. Work through them in order on your next shoot and the quality jump is immediate.
1. Detail the Car Before You Touch the Camera
Every expert guide starts here for a reason. A dirty car is the fastest way to kill buyer trust. Do the car retouching, wash the exterior, dress the tires, clean the glass, vacuum the interior, and remove floor mats if they show wear. For used car dealership photography, posting images of a dusty or streaked vehicle signals to the shopper that you do not sweep the small things, and they assume the same about service records.
Pro tip: keep microfiber cloths and glass cleaner in your photo kit for quick touch-ups between shots.
2. Choose the Right Location
Your background sets the frame for every vehicle on the lot. A cluttered backdrop, trash cans, other cars, random signage, pulls attention away from the subject. Scout your dealership and pick one or two clean, consistent backgrounds: a plain wall, a row of trees, a south-facing section of the lot. Shoot every vehicle against those backdrops so your inventory page reads as one cohesive catalog.
For creative shoots, match the location to the car. A lifted truck looks right on gravel and open terrain. A low-slung sports car looks right against smooth concrete or industrial architecture.
3. Use Natural Light and Shoot at Golden Hour
Natural light is the single biggest quality lever in car photography. Harsh midday sun creates strong shadows, blown highlights, and ugly glare on paint. Overcast days produce soft, even light that is flattering on almost every color.
The sweet spot for outdoor shoots is golden hour, the first hour after sunrise and the last hour before sunset. Light is warm, directional, and low, which flatters body lines and reduces reflection problems. Plan your dealership shoots around these windows or use a north-facing shaded area when the sun is high.
4. Master the Core Car Photography Angles
Beginners shoot everything at eye level. Professionals work a set list of angles. Cover these on every shoot:
- Front 3/4 (hero shot): the most important frame. Shot at roughly 45° from the front corner, it shows the full face of the car and one complete side. This is the image buyers see first on listings and search thumbnails.
- Side profile: shot perpendicular to the car to show body lines, stance, and wheel-to-body proportions.
- Rear 3/4: mirror of the hero shot, taken from the rear corner.
- Straight rear: symmetrical, centered, great for muscular or wide-bodied vehicles.
- Front straight-on: centered, headlights on.
- Wheel detail: tight, clean shot of one wheel.
For inventory photography, shoot this same sequence for every vehicle in the same order. Consistency across 100+ listings is what makes a dealership site look professional.
5. Get Low
Shooting a car from standing height makes it look like a shopping-cart snapshot. Dropping your camera to bumper height or even wheel height changes everything, the car looks larger, more aggressive, and the body lines read properly.
For most exterior angles, aim for a camera height somewhere between the bottom of the wheel and the top of the headlight. Try several heights on the same angle and compare. For SUVs and trucks, you can go slightly higher. For sports cars, get as low as you physically can.
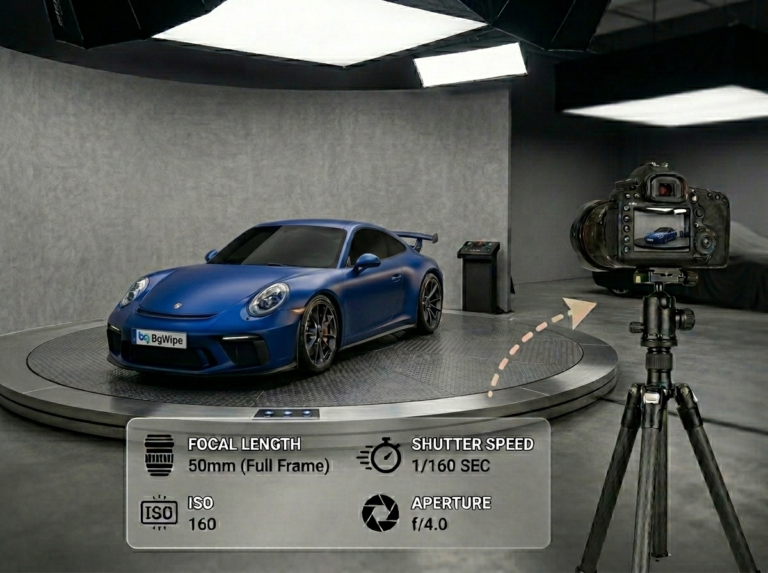
6. Dial in Your Camera Settings (ISO, Aperture, Shutter Speed)
Understanding the exposure triangle is the fastest way to elevate your car photography.
- ISO: keep it as low as your light allows. ISO 100–400 for daylight, push only when necessary. Low ISO keeps paint smooth and free of noise.
- Aperture: f/8 to f/11 for sharp, front-to-back detail on exterior and inventory shots. Open up to f/2.8–f/4 for shallow depth of field on detail shots or creative work.
- Shutter speed: fast enough to avoid handshake (1/125s or faster for handheld), slower on a tripod. For motion blur on rolling shots, drop to 1/60s–1/125s and pan with the car.
Shoot in RAW. It gives you the latitude to recover highlights on paint and correct white balance in editing, both critical for automotive work.
7. Control Depth of Field Intentionally
Depth of field decides what the viewer’s eye locks onto. For dealership exterior shots, you want the entire vehicle sharp, shoot at f/8 or narrower so front and back wheels are equally crisp. For interior detail shots, or creative portfolio work, a wide aperture like f/2.8 blurs the background and isolates a single element, a badge, a stitched headrest, a steering wheel.
Remember that depth of field also changes with focal length and distance. A 70mm lens at f/4 from 10 feet produces a very different look than a 24mm lens at f/4 from 3 feet.
8. Use a Telephoto Lens for Compression and Cleaner Backgrounds
A 70–200mm zoom is the quiet secret of a lot of professional automotive photographers. Wide-angle lenses (below 35mm) distort the car’s proportions, wheels look stretched, the nose looks oversized. A telephoto compresses the scene, keeps proportions accurate, and throws the background softer.
For dealership inventory, a 35–70mm range handles the full exterior comfortably. For portfolio and editorial work, a 70–200mm lets you shoot the car from farther back and pull mountains, buildings, or skies in tight behind it.
9. Use a Circular Polarizing Filter (CPL) to Kill Reflections
If you photograph cars for more than a week, buy a CPL filter. It is the most useful single accessory in car photography.
A CPL screws onto your lens and cuts reflections on paint, glass, and chrome. Rotate the ring and watch windshield glare disappear, paint reflections soften, and colors deepen. On a white or black car in bright light, a polarizer is often the difference between an unusable frame and a clean one.
Note: CPL filters reduce light by 1–2 stops, so you may need to compensate with ISO or shutter speed.
10. Experiment with Reflections
Reflections are a double-edged tool. Uncontrolled reflections kill an inventory shot, you see the photographer, the lot, the sky blown out on a hood. But controlled reflections are one of the most powerful compositional devices in creative car photography.
Park the car next to a wet street and shoot the symmetry. Use a building’s glass facade as a mirror. Position a sunset so its colors pool on the hood. The rule: if the reflection adds information or mood, keep it. If it distracts, polarize it out, reposition the car, or remove it in post.
11. Shoot the Interior the Right Way
Interior photography is where a lot of dealership photos fall apart. Interiors are dark, tight, and full of reflective surfaces. A few fixes:
- Open all four doors and the trunk for your first interior-context shot so ambient light reaches every seat.
- Shoot at wide angles (16–24mm on full frame) to fit the dashboard and front seats in one frame.
- Brace the camera or use a small tripod, interiors often need slower shutter speeds.
- Capture the required inventory set: full front interior (from the back seat looking forward), driver’s seat and wheel, infotainment screen, odometer reading, rear seats, cargo area.
- Call out feature shots: heated seat buttons, navigation, premium audio, sunroof, third-row access.
For higher-end listings, crank up the dashboard lights and infotainment screen before shooting, lit displays read as “this car works” at a glance.
12. Take Detail Shots That Tell a Story
After the standard angles, slow down and work the details. Badges, headlight clusters, wheel spokes, stitched leather, exhaust tips, keys in the ignition, odometer, VIN plate. These shots do three things:
- They prove condition (close-ups of tread, paint, and interior materials build buyer trust).
- They give a listing enough images to feel thorough.
- They give social media and marketing teams assets beyond the hero shot.
For dealerships, detail shots are also where honesty lives. If a used car has a scratch or chip, photograph it clearly and close. Transparent listings get higher-intent inquiries.
13. Understand Tripods and Stabilization
A tripod solves three problems at once: camera shake, inconsistent framing across vehicles, and low-light noise.
For inventory photography, a tripod locked at a fixed height and distance lets every car on your lot occupy the same frame in the same way, which is exactly what makes an inventory page look like a dealership and not a classifieds board. For night shoots and long exposures, a tripod is non-negotiable.
If you shoot inventory handheld for speed, at least use a two-point stance: elbows in, both hands on the camera, shutter pressed on the out-breath.
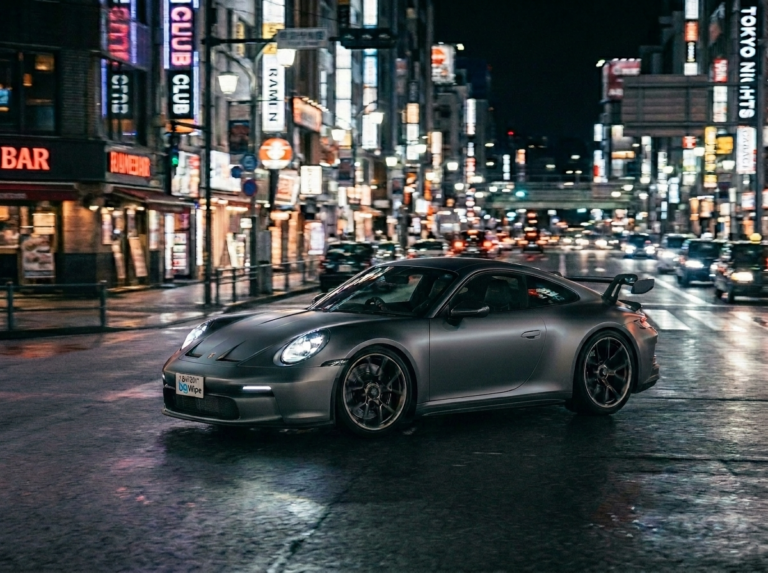
14. Try Car Motion and Night Photography for Creative Shots
Two techniques elevate portfolio work beyond static shots:
Car motion blur (panning shots): set shutter priority to 1/60s or slower, track the moving car with your camera as you release the shutter. The car stays sharp, the background blurs into streaks, and the image conveys speed. Start at 1/125s and work slower as you get confident.
Car night photography: find a location with minimal ambient light, mount on a tripod, set ISO to 100 and aperture to f/8–f/11. Use shutter speeds of several seconds and experiment with light painting, walk around the car with a flashlight during exposure, painting panels one section at a time. Turn the headlights on for a stronger focal anchor.
Neither technique belongs in dealership inventory photos, but both are how automotive photographers build a portfolio that gets hired.
15. How to Take Car Pictures With a Phone
A modern iPhone or Pixel is genuinely capable for dealership photography. The rules shift slightly:
- Clean the lens. Oily fingerprints are the number-one reason phone car photos look soft.
- Do not digitally zoom. Walk closer or use the built-in telephoto lens if your phone has one, digital zoom destroys resolution.
- Shoot in the main wide lens, not the ultra-wide, ultra-wide distorts cars.
- Lock exposure. Tap the car body on your screen, then slide the exposure down slightly to protect highlights on paint.
- Use a clip-on polarizer. Small CPL filters for phones exist and they make an enormous difference on reflective paint.
- Enable the highest resolution and turn off over-processed AI modes that sharpen and saturate automatically.
For dealerships scaling inventory, a consistent phone workflow with an AI editing layer on top now produces results indistinguishable from a DSLR shoot in under two minutes per vehicle.
Why You Should Choose BgWipe for Car Photography?
The 15 tips above get you to a clean capture. What happens after the shutter clicks is where dealerships and photographers spend most of their real time, and where most of the quality gap between a good listing and a great one actually lives.
BgWipe is an AI car photography and merchandising platform built specifically for automotive retail. It takes raw lot photos, phone or camera, any lighting, any background, and turns them into studio-grade images in seconds. Here is what it does:
- AI Background Replacement: removes any cluttered lot, garage, or street background and replaces it with a clean, studio-quality virtual car showroom setting so every vehicle takes center stage.
- Reflection Removal: eliminates distracting glare on paint, glass, and body panels to reveal the true finish.
- Shadow Generation: adds natural, accurate ground shadows so cars look anchored and real, not cut-and-pasted.
- Number Plate Masking: automatically detects and masks license plates across your entire inventory for compliance and customer privacy.
- Window Tinting: applies a clean, consistent tint that elevates the perceived value of every vehicle.
BgWipe integrates directly with the platforms US dealerships already run on, so edited images flow straight into your inventory management system without manual uploads.
Using BgWipe solutions for used car dealerships. You get consistent results, a studio-quality visuals across every listing, faster speed to market, and higher engagement on VDPs. For automotive photographers managing multi-dealer accounts, BgWipe handles the repeatable post-production work so your time goes into capture and creative, not masking plates in Photoshop.
You can try BgWipe’s PhotoRoom free or book a demo to see how it plugs into your existing dealership workflow.
Conclusion
Car photography rewards discipline more than it rewards gear. Detail the car first. Find good light. Shoot the full angle set. Get low. Manage reflections. Dial in your camera settings. Take the details. Edit with intention.
Whether you are a solo automotive photographer building a portfolio or an inventory team moving dozens of used cars a week, the fundamentals are the same. Capture clean, consistent, honest images, and use AI tools like BgWipe PhotoRoom to handle the repetitive editing work so every listing on your site looks like it was shot in a studio.
The dealerships doing this right are selling inventory faster. The photographers doing this right are building books that get them hired. The tips above are the baseline, now it’s about execution.