Car photography lighting is the defining factor between professional and amateur vehicle images. This guide covers how light behaves across paint, glass, and chrome surfaces, and breaks down the three core setup approaches: outdoor natural light, controlled studio rigs, and three-point lighting technique. Practical tips address light source size, reflection control, angles, and camera settings. Night photography and light painting techniques are also covered for dramatic results. For dealerships managing inventory at scale, the guide explains how BgWipe’s AI-powered editing compensates for inconsistent lot conditions, delivering studio-quality visuals without requiring specialist equipment or reshoots.
Why Car Photography Lighting Makes or Breaks Your Shot
A car is one of the most challenging subjects to photograph. Reflective paint, chrome trim, glass panels, and curved surfaces all interact with light in ways that can look stunning or disastrous depending on how you control your setup. Car photography lighting is not just a technical detail. It is the single most important factor that determines whether a vehicle image looks professional or amateur.
For car photographers working on editorial, commercial, or creative projects, lighting shapes the mood, depth, and character of every image. For used car dealerships, the stakes are even more business-critical. Vehicle listing images are the first thing online buyers engage with. Poor lighting in listing photos flattens the car, hides its condition, and kills buyer confidence before anyone reads a word of the description.
Whether you are setting up a full automotive studio lighting rig or shooting on a dealership lot with natural light, understanding how light behaves across car surfaces is the foundation of everything. This guide covers the core principles, practical setup techniques, and the best car photography lighting ideas for both professional photographers and dealerships looking to improve inventory visuals.
How Light Behaves on a Car’s Surface?
Cars are essentially large mirrors. Unlike matte surfaces, where light scatters predictably, a glossy painted panel reflects everything in its surroundings. This means your light sources, your environment, and even your own silhouette can show up in the shot if you are not careful.
The three surfaces that create the most lighting complexity in car dealership photography are:
- Paint: Metallic and pearl finishes reflect light in multiple directions. Lighting that is too direct creates hot spots, while lighting that is too soft can flatten the finish and lose the sparkle. The goal is controlled reflection, not the elimination of it.
- Glass: Windshields and windows pick up sky, surroundings, and light sources as strong reflections. A polarizing filter reduces this significantly and is one of the most useful tools in any car photography lighting setup.
- Chrome: Chrome reflects at very high contrast. Placing large, soft light sources near chrome elements produces clean, gradual gradients rather than harsh point reflections.
Understanding these three surface behaviors shapes every lighting decision you make, whether you are working in a studio or outdoors.
How to Set Up Lighting for Car Photography?
Setting up lighting for car photography is not a single formula. The right approach depends on whether you are working outdoors with natural light, building a controlled car studio lighting setup, or applying a structured multi-light technique. Each context has its own logic, and understanding the differences helps you make faster, better decisions on every shoot.
1. Outdoor Natural Light Setup
Natural light is accessible, flattering when used correctly, and completely free. The key is timing. The best car photography lighting outdoors comes from shooting during the golden hour, the 30 to 45 minutes after sunrise or before sunset. At this time, the sun sits low on the horizon and produces soft, warm, directional light that enhances paint depth, adds dimension to body lines, and reduces glare on glass and chrome.
Overcast skies function as a natural softbox. Cloud cover diffuses sunlight across a wide area, which gives you even, shadow-free illumination. This is particularly useful for detail shots and interior photography, where you want clean visibility without hotspots.
For outdoor setups, always position the car so that the primary light source is not falling directly on the lens-facing panels. Side lighting adds contour and depth. Front three-quarter positioning with the light coming from slightly off-center tends to produce the most balanced results for dealership listing shots.
Carry a reflector to fill in shadow areas on the darker side of the car. A silver reflector adds contrast and punch, while a white reflector gives a softer, more neutral fill.
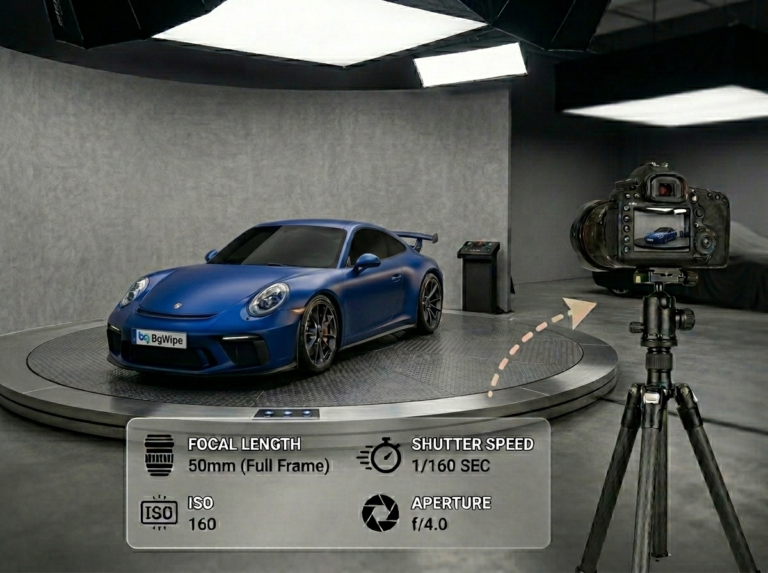
2. Car Studio Lighting Setup
Studio car photography gives you complete control over every variable. You are not dependent on weather, time of day, or location. A professional car studio lighting setup typically uses a combination of large softboxes or strip lights to create the broad, gradient illumination that works best on reflective surfaces.
The most effective car studio lighting approach is to avoid direct light entirely. Instead of pointing a strobe at the car, direct large softboxes toward white ceiling panels, reflective backdrops, or white foam boards surrounding the vehicle. This technique, known as indirect or subtractive lighting, wraps the car in even illumination and lets you control specific reflections by adding or removing dark panels where you want shadow.
For a practical car photography lighting setup in a studio environment:
Position a large softbox or strip light on each side of the car, aimed upward or at white bounce surfaces rather than directly at the vehicle. Add a background light to separate the car from the backdrop. Use black foam boards or fabric to introduce intentional shadows that define body lines and add dimension. A minimum softbox size of 60x40cm is recommended given the scale of the subject. Larger modifiers, such as 150cm octa boxes or full strip banks, produce smoother gradients across longer body panels.
Continuous LED panels have become a popular choice for automotive studio lighting because they let you see reflections in real time as you adjust each light, without needing to test-fire flash and review. Strobes still offer higher output and sharper freezing of detail, which is valuable for exterior hero shots.
3. Three-Point Lighting for Car Photography
The three-point lighting rule is a foundational technique in studio car photography. It uses three distinct sources working together. A key light defines the car’s primary shape and surface reflections. A fill light on the opposite side softens shadows and controls contrast. A rim or back light positioned behind the vehicle highlights body edges, wheel arches, and contours and separates the car cleanly from its background.
Together, these three sources create depth and visual separation that a single light source cannot produce on its own. The ratio between key and fill determines the mood. A 2:1 ratio produces clean, commercial results suited to dealership and catalog photography. A 4:1 ratio creates dramatic shadow contrast better suited to cinematic or editorial work.
6 Best Car Photography Lighting Tips
Knowing the theory behind lighting for car photography is one thing. Applying it consistently across different shoots, vehicles, and conditions is another. Following the top car photography tips are the practical habits that separate photographers who get reliable results from those who get lucky ones.
1. Shoot Under Controlled Conditions Whenever Possible.
Even a simple indoor garage setup with two LED panels and a white backdrop will outperform mid-day lot photography with no lighting control.
2. Use Large, Soft Sources
The bigger the light source relative to the car, the smoother and more gradual the reflections. Small, hard sources create harsh, concentrated hotspots that are difficult to remove in post-processing.
3. Control Your Reflections, Do Not Fight Them
On a reflective surface, the goal is to shape what the car reflects. Placing large white panels around the car gives you clean, smooth gradients. Dark panels add shadows that define edges.
4. Mind Your Car Photography Angles
The front three-quarter angle is the industry standard for dealership listings and hero shots because it communicates the front fascia, hood, profile, and one side panel in a single frame. Low car photography angles emphasize stance and ground presence. Higher angles suit interior and roof detail shots. Your chosen angle should always inform where you position your lights, since light direction and camera position work together.
5. Use a Tripod Every Time
In studio setups and low-light conditions especially, camera shake is one of the most preventable quality problems. A tripod keeps your composition locked while you adjust lights and review reflections between shots.
6. Keep ISO Low for Clean Results
In daylight or studio car photography, ISO 100 to 200 gives you maximum detail and accurate color rendition. For a full breakdown of aperture, shutter speed, and ISO combinations across different shooting scenarios, refer to a dedicated car photography settings guide.
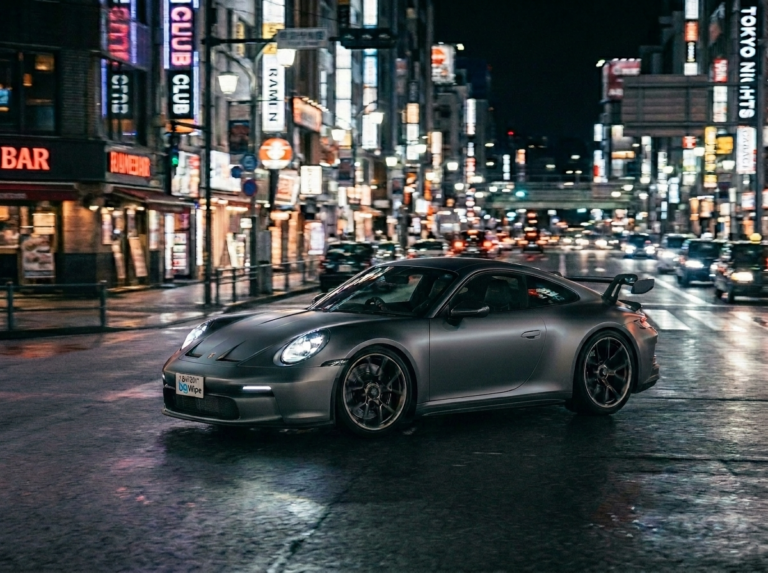
Night Car Photography Lighting
Night shoots produce some of the most dramatic results in car photography, but they require deliberate planning around your lighting setup. Without ambient daylight filling shadows, you have to build the entire exposure yourself using artificial sources.
Light painting is the technique most closely associated with car light photography at night. Set your camera on a tripod, use a long exposure between 15 and 30 seconds, and walk around the car during the exposure using a handheld LED panel or torch to selectively illuminate different surfaces. Because you are moving continuously, you do not appear in the final frame. Multiple passes can be combined in post-processing to build layered, precise lighting that would be impossible with a single static source.
For night car photography lighting using strobes or LED panels, position your sources to skim across the car’s surfaces at low angles. This rakes light across the paint and reveals texture and depth that flat frontal lighting destroys. Always use a diffuser or softbox with flash at night. Bare flash creates harsh hotspots on paint that are nearly impossible to recover in editing.
For the lighting setup specifically, start with ISO 100, aperture at f/8, and a shutter speed of 20 seconds as a baseline for light painting. Adjust from there based on ambient conditions and your light source output. For a full breakdown of night car photography covering location, composition, long-exposure techniques, and movement, see our dedicated night car photography guide.
How BgWipe Solves Car Photography Lighting Challenges
Even experienced photographers do not always have access to ideal lighting conditions. Dealership lot photography happens in harsh midday sun, under fluorescent overhead lights, and in cramped spaces where proper automotive studio lighting is simply not practical. The result is inconsistent images that vary in exposure, color accuracy, and overall quality from one vehicle to the next.
BgWipe is an AI-powered car image editing platform built specifically for automotive retail. It addresses the most common lighting-related problems in dealership photography without requiring a studio or a professional photographer on-site.
BgWipe’s background replacement tool removes any distracting or poorly lit lot environment and replaces it with a clean, studio-quality backdrop. Vehicles photographed in flat, harsh, or uneven light appear professionally presented. The reflection removal feature identifies and eliminates unwanted surface reflections across paint and glass, cleaning up the visual noise that uncontrolled lighting creates. Shadow generation adds a natural ground shadow beneath the vehicle, giving it the anchored, three-dimensional look of a proper virtual car showroom studio shot.
For dealerships managing large inventories, BgWipe processes images at scale. Every listing can reach a consistent visual standard without requiring reshoots, studio rentals, or per-image editing time. The result is a listing library that looks intentional and professional, which directly supports buyer confidence and listing engagement.
Conclusion
Good car photography lighting is a discipline built on understanding how light interacts with reflective surfaces and then making deliberate choices to shape those interactions. The golden hour gives you flattering natural light for free. A proper car studio lighting setup gives you complete control regardless of weather or time of day. Night shoots and light painting open up a different creative range entirely.
For dealerships, the practical challenge is maintaining consistent lighting quality at scale across every vehicle in inventory. BgWipe bridges that gap, turning lot-condition photography into listing-ready, studio-quality visuals without adding complexity or cost to the existing workflow. When every listing looks professionally presented, buyers engage more, trust faster, and move through the decision process with greater confidence. Try BgWipe PhotoRoom for free today!